Lesson 2: Everyone Lives in a Watershed
The Earth is indeed a blue planet with abundant water; the challenge is that only a tiny fraction of this water is freshwater. As a result, freshwater is arguably the Earth’s most valuable resource, and it is our job to protect the watershed and use water wisely. In this lesson, we demonstrate how much of Earth’s water is freshwater, identify our watershed on a map, and then build a model of a watershed.
The class will begin with a simple teacher-led demonstration showing how much of Earth’s fresh water is usable for people and animals. This demonstration reinforces the concept that while the Earth has a lot of water, fresh water is scarce and must be protected and conserved.
In the next activity, we will orient students to their geographic location and define their place in their local watershed by showing a map of your watershed. A watershed is a system defined by the area of land over which all water drains downhill through a series of streams and rivers to a common outlet (river, lake, bay, or ocean). The local watershed is determined by following the topography downhill to the first body of water (stream, river, pond, or lake). Smaller watersheds are nested inside larger watersheds. As rivers flow downhill and small tributaries combine to form large rivers, the land affects the water quality in those waterways. For example, you may say, “We live in the Chesapeake Bay Watershed, and our water flows to the Chesapeake Bay, and what we do impacts the health of the Chesapeake Bay.”
In the final activity, we will build a model of a watershed. A common misconception is that water flows from north to south or “down the map.” We are going to see that water flows downhill. Watersheds are divided by ridgelines (the tops of the hills), and each stream has a land divide, a ridgeline, separating the land that drains into that stream from other watersheds. As streams flow together, the watersheds combine to form larger watersheds that drain to the common river. The topography (or shape of the land) determines where the water flows as it moves downhill by the force of gravity.
Materials:
Materials provided in the :
- Activity 1: 1-liter measuring cup, 2 medicine cups, food dye, salt
- Activity 2: Map of your state’s Watersheds
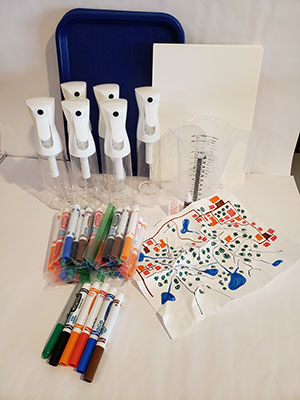
- Activity 3: 6 sets of materials for students to work in small groups. Each set includes 1 sheet of art paper, 1 tray, 1 water bottle, 1 green permanent marker, and a pack of washable markers.
Materials you will need to gather:
- Lesson 2 slide show
- Activity 2: Sticker to mark the map
- Activity 2: Video “Where are Your Waters? (Chesapeake Bay Watershed)”
- Activity 3: 6 copies of the Model Watershed coloring directions
- Assessment: one copy of the Exit Ticket for each student
Learning Objectives:
At the completion of the lesson, students will be able to:
- Use data to explain why freshwater is a scarce and valuable resource on Earth
- Use a map to identify their watershed
- Create a model of a watershed and identify watershed boundariesand where water flows when it rains
Activities:
 Begin the class by asking students, “How much of the Earth’s surface is covered in water?” Students should remember from yesterday’s lesson that 71% of the Earth’s surface is covered by water. (For specific percentages related to where water is on Earth, you may reference One Well by Rochelle Strauss, p. 7.) Explain that although Earth has a tremendous amount of water, many people say that freshwater is one of Earth’s most precious natural resources. Ask students why freshwater is so valuable if most of the Earth is covered in water.
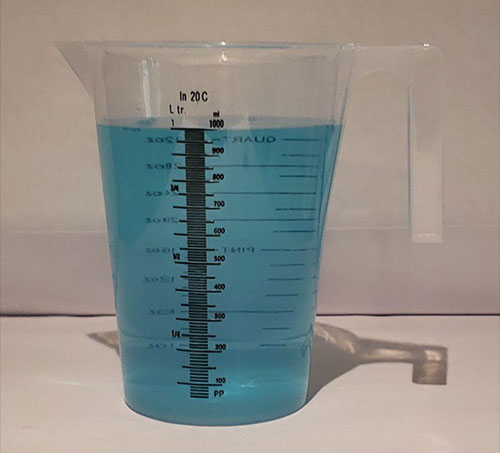
To begin the demonstration, arrange the materials (1-liter measuring cup, two medicine cups, food coloring, and salt) on a table where all students can see them. Fill the 1-liter measuring cup to the 1000 mL mark with tap water and add a few drops of food coloring to make the water easier to see. Tell the class that this cup represents all of the water on Earth. Ask students, “If this cup represents all of Earth's water, how much of it do you think is salt water found in the oceans?” Allow students to share their predictions. They may suggest half, ¾, or other estimates.
Pour 30 mL of water from the 1000 mL measuring cup into a small medicine cup. Explain that about 97% of Earth's water is salt water found in the oceans. Dramatically open a salt packet, pour it into the large measuring cup, and stir. Explain that the salt represents the ocean water, which is too salty for humans to drink or for most plants and animals to use directly.
Hold up the 30 mL cup and ask, “If 97% of Earth's water is salt water, what percentage is freshwater?” Students should recognize that only about 3% of Earth's water is freshwater.
Next ask, “Did you know that most of Earth's freshwater is frozen in glaciers and ice caps?” Invite students to estimate what percentage of freshwater they think is frozen. Explain that about 70% of Earth's freshwater is locked away in glaciers and ice caps. Pour 21 mL of water from the 30 mL medicine cup into a second medicine cup and place it beside the large measuring cup. Explain that the water in both the 1-liter cup (salt water) and the 21 mL cup (glaciers and ice caps) is generally unavailable for human use.
Finally, hold up the remaining 9 mL of water and say: “This tiny amount represents all of Earth's remaining freshwater. Much of it is stored underground, leaving only a very small fraction in lakes, rivers, and streams where people and wildlife can easily use it."
Emphasize:
“Freshwater is one of Earth's most valuable natural resources. Protecting it is essential for people, plants, animals, and the health of our communities."
This demonstration helps students visualize why freshwater is such a scarce and valuable resource, even though Earth appears to have an abundance of water.
CALL TO ACTION - Tell students, “By the end of this unit, our goal is to create an action plan that will either improve our watershed or inform others about it. If you are asking what a watershed is, then you are in luck because we will learn all about it."
Everyone lives in a watershed. There are 78 major watersheds, in the lower 48 states. In this activity, we will orient students to their geographical location and define their place in their local watershed by showing a large, laminated map of YOUR watershed.
Teacher Tip: Contact your state's Department of Environmental Protection (or equivalent environmental agency) or your local Conservation District for large watershed maps of your region. Many agencies provide free downloadable or printed maps for educational use. The EPA's How's My Waterway and the USGS Streamer tools are also excellent resources for identifying your school's local watershed and printing customized watershed maps.
Ask the class where their school is located on the map and let students guess. Point out the state and county boundaries, then place a dot on the map to show where the school is located. For example, if you live in central Pennsylvania, explain that even though we live in Pennsylvania, our streams and rivers flow to the Chesapeake Bay. That means we also live in the Chesapeake Bay watershed. Ask students what they think a watershed is and write some of their ideas on the board. After discussing their ideas, show the What is a Watershed video.
 Before class starts, get ready for the activity by arranging the materials on six separate trays. Each tray should have one sheet of art paper, a water bottle, a permanent green marker, and a pack of washable markers. Divide students into six groups and provide each group with a tray as they begin the activity.
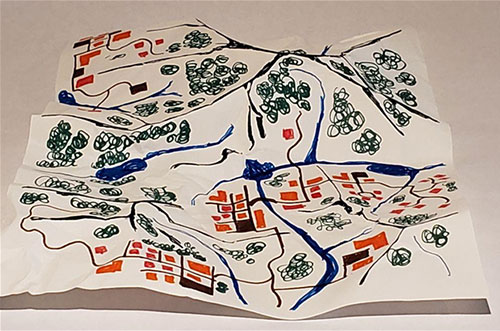
Have one student in each group gently crumple the sheet of paper into a loose ball and then carefully unfold it without flattening it completely. Explain that the hills and valleys created by the wrinkles represent the Earth's surface. Tell students they have created a simple topographic model, which is a map that shows the hills and valleys.
Give students a copy of the Model Watershed coloring directions and have them add details to their map using the provided key. Students may need help identifying the ridgelines, and you may want to model finding the ridgelines for students. Encourage students to color the ridgelines deeply. Then, students should use their markers to create towns, forests, roads, rivers, and lakes. As you circulate, prompt students to think about where rivers and lakes will likely form.
When there are approximately 7-9 min remain, ask students to put away their markers. Explain that they will now investigate what happens when it rains on their watershed. Using the spray bottle, have students gently spray water across the entire model. Encourage them to carefully observe where the water flows and where it collects. As students investigate, help them notice that water always flows downhill. Water falling on opposite sides of a ridgeline flows in different directions, creating the boundaries between neighboring watersheds. Ask students to identify additional watershed boundaries on their models, noting that many small watersheds may be present. Also, help the students notice where water collects. This pooling of water is where rivers and lakes form and predict where the rainwater will flow. Students should also notice that most of the washable marker ink is carried by the flowing water into the streams and lakes. Explain that this models how pollution left on the land can be washed into nearby waterways during rainstorms. One exception is the green marker which represents forests and other vegetated areas. Water that falls on the green areas usually soaks into the ground and replenishes our groundwater while reducing runoff and erosion. If there is time, let students walk around the room and compare the different watershed models, discussing similarities and differences in water flow, watershed boundaries, and areas where water collected.
Possible Extension:
Have students repeat the activity, using what they learned from their first watershed model to redesign the landscape. Challenge them to build a community where the rivers and lakes stay clean and blue by reducing muddy runoff through thoughtful placement of forests, roads, towns, and other land features.
Assessment:
Bring the class back together and use what they learned to create a definition of a watershed. A sample definition is “A watershed is all the land where water drains downhill to a common body of water.”
End by asking students to give the name of our watershed. Answer: We live in the Chesapeake Bay Watershed. Then, give students an exit ticket to complete individually or in small groups.
Exit Ticket - Complete ONE of the following sentence starters.
- In a watershed, water flows downhill because ________________
- In a watershed, water flows downhill, so ___________________
- In a watershed, water flows downhill, but __________________
Reading Connection:
Niver, H., 2014. Tributaries of the Chesapeake Bay. 1st ed. New York: Gareth Stevens Publishing.
Strauss, R., & Woods, R. (2007). One well: The story of water on Earth. Kids Can Press. (from lesson 1)