Lesson 6: The Earth Filters the Water
In Lesson 5, students discovered that healthy watersheds encourage infiltration because it reduces runoff. But what happens after water soaks into the ground? Does it just sit there? And if rainwater soaks into the ground, why isn't our drinking water muddy?
One of the Earth's most amazing jobs happens beneath our feet. As water slowly moves through layers of leaves, soil, sand, gravel, and rock, many impurities are naturally filtered out before the water reaches underground storage areas called aquifers. These aquifers supply drinking water for millions of people across the country through both public water systems and private wells. In fact, about half of the drinking water in the United States comes from groundwater.
As water infiltrates into the ground, it doesn't flow through one big underground tunnel. Instead, it slowly moves through tiny spaces, called pores, between soil particles and rocks. Larger particles, such as sand and gravel, trap leaves, dirt, and other debris. Smaller particles, like clay, can trap even finer materials. Plant roots and soil organisms also play an important role by helping break down some pollutants as water moves through the soil. Although this natural filtration process removes many impurities, it does not remove everything. Some dissolved chemicals and pollutants can still reach groundwater, which is why protecting our watersheds is so important.
In this lesson, students will discover that infiltration doesn't just reduce runoff; it also helps clean our water. To bring this idea to life, they'll take on another engineering challenge. Working in small groups, students will design and build a model of the Earth's natural filtration system using common materials. After testing their design with dirty water, they'll evaluate how well it worked, redesign their filter, and test it again. Along the way, they'll discover that, just like engineers, their first design may not be their best and that testing, improving, and trying again is all part of the engineering design process.
The lesson concludes by connecting this engineering challenge back to students' own schoolyard. Why is infiltration better for the watershed than runoff? How can we design our schoolyard to encourage more water to soak into the ground? Students will discover that one of the best ways to protect our drinking water begins long before the water reaches the faucet.
Materials:
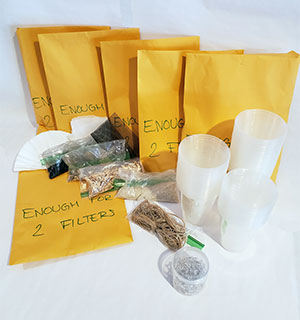
Materials provided in the :
- Activity 1: n/a
- Activity 2: Materials (per group): 6 clear plastic cups, Pushpins (~20), 2 Coffee Filters, 5-10 Rubber bands, Cheesecloth (~1 sq ft), pool filter sand (~ ⅓ cup), activated and triple rinsed aquarium filter charcoal (~ ⅓ cup), gravel (~ ⅓ cup), shaved pine bedding (~ ½ cup), fiberglass screen (~2in sq)
Materials you will need to gather:
- Lesson 6 slide show
- Activity 1: n/a
- Activity 2: ~1 gallon of dirty water made by adding dirt, sticks, leaves, and debris to the water.
- Activity 2: Make one copy of the Engineering an Earth Filter handout per student. Paper towels for cleanup.
Learning Objectives:
At the completion of the lesson, students will be able to:
- Describe the process of infiltration and its role in how the Earth filters water
- Design a model of Earth’s process of cleaning water via infiltration
Activities:
Begin class by asking students where they think the water coming out of the classroom faucet comes from. Some students may know the name of your local water company, while others may think it simply comes from the faucet! Explain where your school's drinking water comes from. For example, Millersville University's drinking water comes from the Lancaster City Department of Public Works. Whether your school gets its water from a public water system or a private well, remind students that the water is safe to drink.
Show the image of the water well in the lesson slides and ask, "Where does groundwater come from?" Give students a chance to share their ideas, then remind them what they learned in the last lesson. Rainwater can take several different paths. Some infiltrates into the ground, some becomes runoff, and some returns to the atmosphere through evaporation and transpiration. Tell students that today they'll investigate what happens to the water that infiltrates into the ground.
Next, show the image of the soil profile in the lesson slides and on the watershed poster. Ask, "If rainwater soaks into the ground, why isn't water from a well muddy?" Give students a chance to share their ideas before explaining that the Earth is an amazing natural water filter. Point out the different layers in the soil profile. At the top are leaves, roots, and other organic matter. Below that are layers of soil, sand, gravel, and rock. As rainwater slowly moves through these layers, larger pieces of dirt and debris get trapped first, while smaller particles are filtered out as the water continues moving downward. Plant roots and tiny organisms in the soil also help break down some pollutants, and materials rich in carbon, like charcoal, can trap some dissolved impurities. Eventually, the filtered water reaches underground storage areas called aquifers, where it can be pumped to the surface through wells or used as a source of drinking water.
Remind students that the Earth's filter does an amazing job cleaning water, but it doesn't remove everything. Some dissolved chemicals, bacteria, viruses, and pollutants can still reach groundwater. That's why drinking water is treated before it reaches our homes and schools, and it's one more reason why protecting our watersheds is so important.
*adapted from Engineering a Model of the Earth as a Water Filter
Now, pose the engineering challenge. Tell students that today they'll become environmental engineers by building a model of the Earth's natural filter. Their challenge is to design a filter that removes as much dirt and debris as possible from dirty water. Show the slide with the design of the filter.
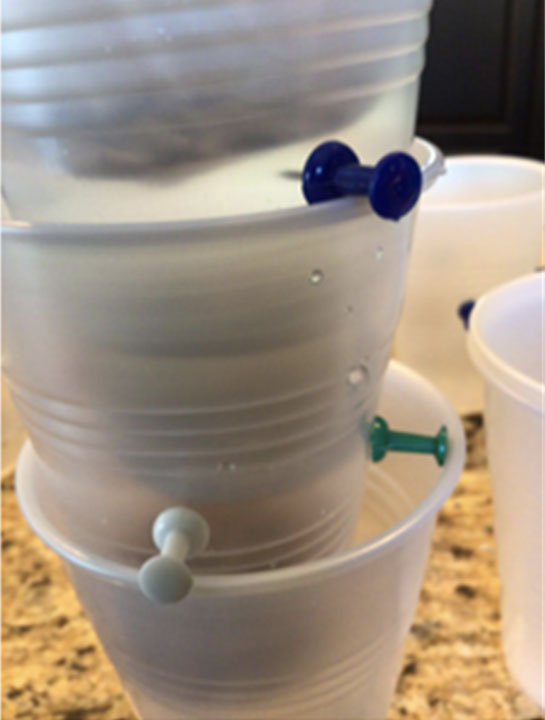 Divide students into small groups and give each group a copy of the Engineering an Earth Filter handout along with a set of materials. Explain that the materials represent the different materials found underground, but there is no single "right" way to build the filter. Students can use one material or several materials in the same cup (layer), repeat materials in multiple cups, or choose not to use every material.
Before students begin building, have each group work together to complete Design #1 on the handout. Encourage them to discuss their ideas, sketch their planned filter, and explain why they chose their materials and the order of the layers. Remind students that they have enough materials to build two versions of their filter, so they should use only about half of each material during their first design and save the rest for their redesign.
To build the stackable filter, students will use five cups with holes punched in the bottom so water can flow through each layer. The sixth cup is the collection cup and represents the aquifer beneath the ground. Do not punch holes in the collection cup or you'll have a leaky mess! As students build, encourage them to compare their design to the soil profile shown in the lesson slides and on the watershed poster. Ask questions such as, "Which materials in your filter represent the leaves and organic matter? Which represent the sand and gravel? Why did you arrange them in that order?" There is no single "correct" design, so encourage students to explain the thinking behind their choices.
Have each group slowly pour one cup of dirty water into their filter and observe the results. Students should record their observations on the Engineering an Earth Filter handout and evaluate how well their design worked. Then challenge them to complete the redesign section of the handout before building Design #2. After testing their improved filter, have students compare the results of both designs and reflect on what they learned.
Conclude the lesson by asking students why infiltration is better for a watershed than runoff. Reinforce that infiltration not only reduces runoff, but also gives water the opportunity to be naturally filtered as it moves through the ground.
CALL TO ACTION - Ask students, “Think about the walk around the schoolyard we did where we identified pervious and impervious surfaces. What changes can WE make to the schoolyard to increase infiltration and reduce runoff?"
Possible Extension:
You can save the students filtered water and use the lesson 7 supplies to test the chemistry of this water.
Possible Differentiation Adaptations:
For groups that struggle with fine motor skills, you can provide them with stackable cups that already have the holes poked on the bottom and the pushpins placed on the sides. With these modifications, students only need to design the layers and add the chosen materials to each layer.
Assessment:
Compare the original dirty water to the filtered water.
- How well did your filter work? What evidence supports your answer?
- Is the filtered water safe to drink? Why or why not?
- How does this activity help explain why infiltration is better than runoff?
The filtered water is not safe to drink. Dissolved chemicals, bacteria, viruses, and other pollutants may still be present.